I've founded this tutorial for creating beautiful pompoms in the that blog. I want to find time to try to make such pompoms myself.


2. The one with the inner part(right in the pics) and one without(left in the pics) mace a pair. Put two together facing each other so the small glued-on inner part is between the larger outer arcs. Each pair makes one half of your pompom maker.
3. Now draw of your pompom design roughly on paper and draw a line down the middle(dotted line in the diagram below). if you imagine that this line is your pompom maker viewed from the top, you can see how the yarn should be layered based on your drawing. Starting with whatever is directly in the middle touching this centre line add yarns accordingly in layers toward the outer circle edge.
I did this in reverse at first, starting with the background colour and finishing with the colours in the middle.
it sort of worked but the result was a little bit messy, Then I figured out starting it from the middle like below, working outwards, which is a lot easier.


4. Make the other half. I just made it with white yarn only but you can repeat the same thing to have the flower design on both sides. Don't wrap the yarn beyond the fold lines. (Of course you can fold the end tabs first and thet wrap it, which I forgot to do when I took these fotos.)

5. Now fold all tabs outward and bring the two parts together to form a whole circle. Clip the tabs together with binder clips as in the photo below.
.jpg)
6. Insert scissors into the gap between the cardboard pieces and cut the yarn. As you do, the hidden pattern will be revealed like a blossoming flower which is an exciting part.
.jpg)
7. Insert the yarn between the cardboard pieces, running it all the way around. Pull and tie tightly. Choose a good position for tying it up as you'll use that piece of yarn to hang your pompom. Now you can unclip the clips and pull out the cardboard pieces.

Done. The pompom will not be perfectly round so you'll need to give it a bit of a trim to form a good shape.
Now what do we do with them?
The pompoms might use one to add to a gift wrap, or use it as a gift as it is. Hang it to a kids bag as an accessory or make a flower pompom necklace. Tease a cat or wear in your hair.
Or jast admire them on your desk or hanging about the house. They cheer you up.
question:(
 ,,Do you think it would be the same if I made 2 circles instead of 4 parts?
answer:(mrprintables)
You'd need to make 4 parts pompom maker to be able to split it in the middle so you can tie ap.(if this is what you mean)Hope it make sense!
question:
Can you please eqsplain how you got the pleating green leaves?
answer:(mrprintables)
You can use the flower diagram on the right (or your drawing), so for example, after initially wrapping a layer of green for the stem part, wrap white (background color) over it then wrap a little bit of green again where the leaves are going to be, surrounded by more white yarn. That way you get a bit of green floating in white. It applies to any design - you start from the middle line and wrap each layer outwards. Best to try it out to see how it works


Basically the method is the same. Start with good simple designs that are not too tricky to achieve. Draw your design neatly on paper first so you can follow it clearly. Start with the nose and mouth in the middle. wrap around the surrounding face colour on top of this, a little wrapping floating in the middle for the eyes then finishing with more face colour. then you'll need to make animal ears.

Place a pencil (or your finger) on one end and wrap extra yarn around it a bit like this. Make sure this is the top of the head end, during one of my many dips in concentration I put the ears on the jaw line – you don’t want to end up with a mutant animal. : ( But then pompoms are good to make while thinking about something else at the same time so if it happens and you notice that the ears are in the wrong place when you cut it, just move the longer ear parts to the other side before you finally tie up the pompom.
I had a comment from a reader who thought my pompoms looked perfect and hers weren't. My answer was that it’s all in the trimming. So I took a photo of the animals before the trimming this time. If your pompoms look like this below at first don’t worry!

Before the trimming: a sad koala.

WOW! After some careful trimming, your pompoms will find their identity. A happy koala!

Here are more detailed step-by-step photos showing how to make a lion pompom.
.jpg)
I'm still using the same cardboard pompom maker I used for the flowers. They don’t look very presentable but work fine.
The pics show the top & side view of wrapping the nose part and then the white bits around the mouth over the nose.

After you wrap some face colour all over then add a little bit of black on top where the eyes would be.
Then wrap more face colour to finish off the whole face.

To make the lion’s mane, place two pencils (or anything that works for this purpose) as in the picture so you can wrap longer yarn all around. Take out the pencils and do the rest of the steps to finish.

Here again, the lion before you give him a good haircut.

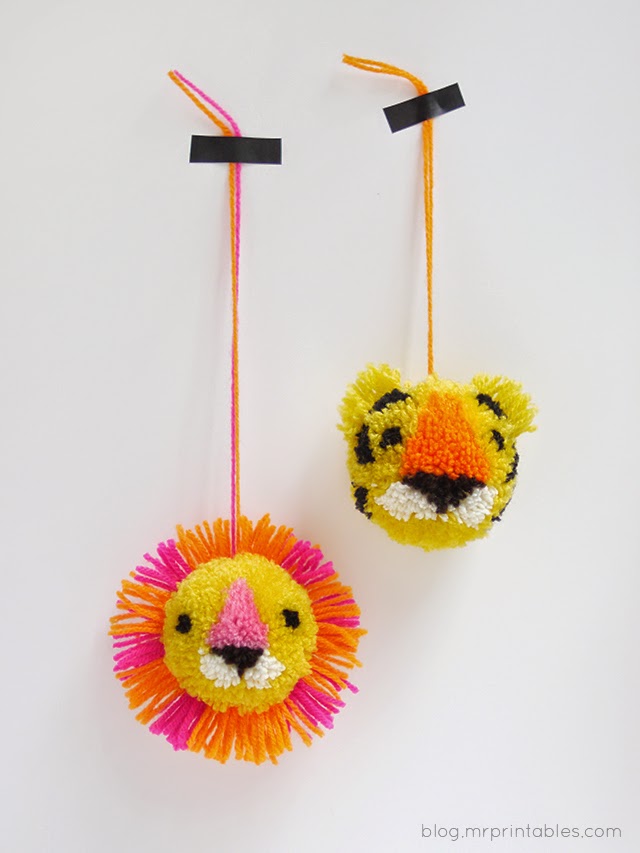
And after the trimming. A clean shaven proud lion!

 I should’ve made male and female lions so they could be a couple, but the mane part is quite fun to add so here they are. Two lion boys – the best of friends!
 Hope you've enjoyed my DIY pom-pom tutorials so far – have a go! Especially when you have more pressing (but less enjoyable) things to do… : )

 http://blog.mrprintables.com/pom-pom-fruit/


http://blog.mrprintables.com/pom-pom-town-play-set/
You'll need: stiff cardboard, 4 small binder clips, thickish yarn in different colours depending on your design.
1. Firstly determine what size of pompom you want to make. This cardboard pompom macer was about 2,5 inch diameter for the outer circle and 1 inch for the inner circle. The final pompoms were quite a large handful in size. The final pompoms seem to be about 10% larger than the diameter of the pompom maker
So according to the size you beside, cut 4 half circles with a hole(inner circle) in the middle with extended ends( let's call them tabs).Make fold lines at each end of the half circle by pressing a ruler across so you can fold those tabs later. Cut smaller half circles and glue them on the large ones(lice the ones on the right in the pics). This is to create some space along the edge between the between the cardboard pieces when they are put together so you can insert the scissors between them easily
2. The one with the inner part(right in the pics) and one without(left in the pics) mace a pair. Put two together facing each other so the small glued-on inner part is between the larger outer arcs. Each pair makes one half of your pompom maker.
3. Now draw of your pompom design roughly on paper and draw a line down the middle(dotted line in the diagram below). if you imagine that this line is your pompom maker viewed from the top, you can see how the yarn should be layered based on your drawing. Starting with whatever is directly in the middle touching this centre line add yarns accordingly in layers toward the outer circle edge.
I did this in reverse at first, starting with the background colour and finishing with the colours in the middle.
it sort of worked but the result was a little bit messy, Then I figured out starting it from the middle like below, working outwards, which is a lot easier.
4. Make the other half. I just made it with white yarn only but you can repeat the same thing to have the flower design on both sides. Don't wrap the yarn beyond the fold lines. (Of course you can fold the end tabs first and thet wrap it, which I forgot to do when I took these fotos.)
5. Now fold all tabs outward and bring the two parts together to form a whole circle. Clip the tabs together with binder clips as in the photo below.
6. Insert scissors into the gap between the cardboard pieces and cut the yarn. As you do, the hidden pattern will be revealed like a blossoming flower which is an exciting part.
7. Insert the yarn between the cardboard pieces, running it all the way around. Pull and tie tightly. Choose a good position for tying it up as you'll use that piece of yarn to hang your pompom. Now you can unclip the clips and pull out the cardboard pieces.
The pompoms might use one to add to a gift wrap, or use it as a gift as it is. Hang it to a kids bag as an accessory or make a flower pompom necklace. Tease a cat or wear in your hair.
Or jast admire them on your desk or hanging about the house. They cheer you up.
question:(
,,Do you think it would be the same if I made 2 circles instead of 4 parts?answer:(mrprintables)
You'd need to make 4 parts pompom maker to be able to split it in the middle so you can tie ap.(if this is what you mean)Hope it make sense!
question:
Can you please eqsplain how you got the pleating green leaves?
answer:(mrprintables)
You can use the flower diagram on the right (or your drawing), so for example, after initially wrapping a layer of green for the stem part, wrap white (background color) over it then wrap a little bit of green again where the leaves are going to be, surrounded by more white yarn. That way you get a bit of green floating in white. It applies to any design - you start from the middle line and wrap each layer outwards. Best to try it out to see how it works
How to make animal pompoms
Basically the method is the same. Start with good simple designs that are not too tricky to achieve. Draw your design neatly on paper first so you can follow it clearly. Start with the nose and mouth in the middle. wrap around the surrounding face colour on top of this, a little wrapping floating in the middle for the eyes then finishing with more face colour. then you'll need to make animal ears.
Place a pencil (or your finger) on one end and wrap extra yarn around it a bit like this. Make sure this is the top of the head end, during one of my many dips in concentration I put the ears on the jaw line – you don’t want to end up with a mutant animal. : ( But then pompoms are good to make while thinking about something else at the same time so if it happens and you notice that the ears are in the wrong place when you cut it, just move the longer ear parts to the other side before you finally tie up the pompom.
I had a comment from a reader who thought my pompoms looked perfect and hers weren't. My answer was that it’s all in the trimming. So I took a photo of the animals before the trimming this time. If your pompoms look like this below at first don’t worry!
Before the trimming: a sad koala.
WOW! After some careful trimming, your pompoms will find their identity. A happy koala!
Here are more detailed step-by-step photos showing how to make a lion pompom.
I'm still using the same cardboard pompom maker I used for the flowers. They don’t look very presentable but work fine.
The pics show the top & side view of wrapping the nose part and then the white bits around the mouth over the nose.
After you wrap some face colour all over then add a little bit of black on top where the eyes would be.
Then wrap more face colour to finish off the whole face.
To make the lion’s mane, place two pencils (or anything that works for this purpose) as in the picture so you can wrap longer yarn all around. Take out the pencils and do the rest of the steps to finish.
Here again, the lion before you give him a good haircut.
And after the trimming. A clean shaven proud lion!
I should’ve made male and female lions so they could be a couple, but the mane part is quite fun to add so here they are. Two lion boys – the best of friends!http://blog.mrprintables.com/pom-pom-town-play-set/
Комментариев нет:
Отправить комментарий